Warhol Style
THE IDEA . . .
This project is more heavily focused on AFTER you have taken your photos. However, remember that the more time and care you take while taking your shot, the less work it is afterwards. Still pay close attention to composition, lighting, depth of field, etc.
The effect we are going for mimics a style created by a Pop Artist by the name of Andy Worhol who was most famous during the 60s. However, I’m willing to bet most of you have seen images that look like these . .
|
|
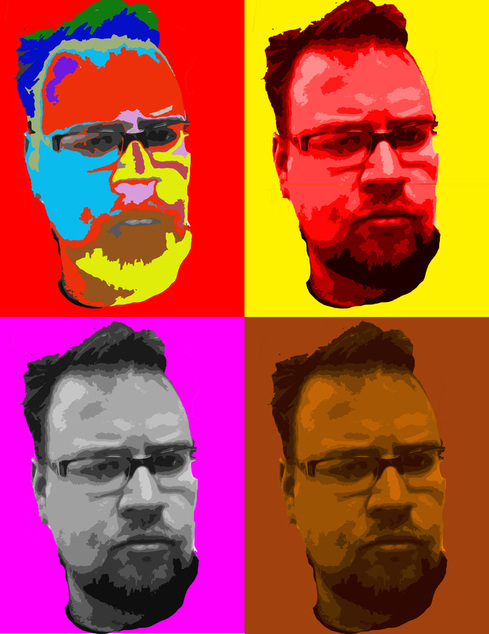
Essentially, these are high contrast photos that have (obviously) had major alterations to their color. There is no RIGHT or WRONG way to go about achieving this style. However, I will show you what I believe is a good way to approach it.
WHAT YOU NEED TO DO . . .
HOW YOU WILL DO IT . . .
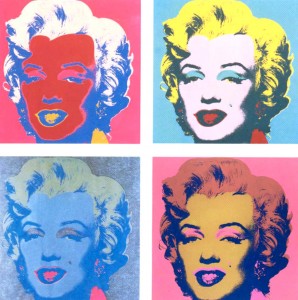
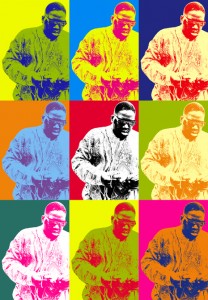
This next section has two approaches. The first is faster and cleaner but doesn’t give you as much creative/color freedom as the second. The first Option will look more like the “Biggie” one above, while the second could look like the “Marylin Monroe” above.
*** ONE WARHOL MUST BE IN EACH OPTION***
Option 1
Option 2
When you are finished . . .
WHAT YOU NEED TO DO . . .
- Create TWO “Warhol Style” Images - One will be a self portrait, the other will be of an object
- These should each have four images total, each using different color schemes (the colors are up to you)
- Each image should fit onto an 8.5×11 inch (letter sized) canvas
- Save them as high quality jpegs in your weebly webpage.
HOW YOU WILL DO IT . . .
- The first step will be taking your photos. Work with a partner and get a portrait of yourself (candid or posed). However, you will need to remove the background. So, try and find a simple background (easier to remove). You will also need an image of an object (your choice, something you find interesting or something you think would make a great photo). Again, simple background is easier. Shoot in High Quality JPEG.
- Open Photoshop. Create a new document 8.5×11 inches, 300 dpi (pixels/inch).
- SAVE OFTEN.
- Under View>New Guide create a guide at 4.25 inches Vertical and one at 5.5 inches Horizontal. This should create four quadrants on your canvas. You have to create each guide separately.
- Using the Rectangle Tool, create four different colored boxes (your choice of colors)., that fit into the quadrants on your canvas.
- Import your portrait/object.
- Using selection tools (Polygonal Lasso, Magic Wand) remove the background. Easiest tool to use (and generally speaking the best results) is the quick selection tool. Once your subject is selected, double click on the background layer to make it editable, inverse your selection, and hit delete to remove the background.
- Now you will convert the image to Black & White by going under Image>Adjustments>Desaturate
- Under Image>Adjustments>Brightness Contrast change the levels to create a high contrast image. You might also need to play with the Exposure depending on your photo.
- Next we will give the image more of a “graphic” feel by applying a filter. Filter>Artistic>Cutout play with the settings on the right (I would suggest 4 or less levels of grey) to create a look that appeals to you. You should now have a stylized, black & white, portrait of yourself. ** If artistic is not an option go to Edit, choose Preferences > Plug-ins > Show All Filter Gallery Groups and Names.
- Using the Move Tool (Black Arrow with Cross Hairs), hold Ctrl and click your image, this will select that layer. Release Ctrl, then hold Alt, click and drag your image to make a copy. Create 3 copies for a total of 4 images. Space them out amongst your colored boxes.
- Take note of your Layers Panel. You may want to start naming these layer to ensure you are staying organized.
This next section has two approaches. The first is faster and cleaner but doesn’t give you as much creative/color freedom as the second. The first Option will look more like the “Biggie” one above, while the second could look like the “Marylin Monroe” above.
*** ONE WARHOL MUST BE IN EACH OPTION***
Option 1
- Select one of your portrait/ object layers. Right click and select Blending Options. Click Color Overlay but, click the words not the check box. This will bring up the Color Overlay options on the right.
- Under Blend Mode select Overlay. Click the colored box and select a color of your choice and then lower opacity until it looks AMAZING. Repeat for all four images.
Option 2
- Select one of your portrait/ object layers. Choose your Magic Wand Tool. If you click a color (or in this case a level of grey), it will select everything within that color range that is connected. If you hold Shift, you can click and select a larger area.
- Choose your Paint Bucket Tool, then double click your Color Picker. Select a color, then click within the selection you made using the Magic Wand.
- Repeat this process until you have colorized the image to your liking.
When you are finished . . .
- Upload the photos to Weebly